Tech blog
How I Installed and Deployed Beszel in My Homelab

I've tried a few monitoring tools in my homelab over time, and I kept running into the same problem: either they were too heavy for what I actually needed, or they turned into a whole project of their own. I didn't want to spend half a day wiring together dashboards, exporters, and databases just to see whether a box was healthy.
That's what made Beszel click for me.
It's a lightweight monitoring platform with a clean web UI, historical data, Docker stats, alerts, and a setup process that doesn't feel like punishment. You run a hub, add agents to the machines you want to monitor, and you're basically off to the races. The current docs support both Docker/Podman and binary installs for the hub, and Docker or binary installs for agents.
In my case, I deployed the Beszel hub in Docker and then added agents to the systems I wanted to watch. That gave me a nice central dashboard without dragging in a giant monitoring stack.
Why I went with Beszel
What I liked straight away was how sensible it felt. No huge mental overhead, no endless YAML maze, and no need to glue six other services together before getting a graph on screen. Beszel is designed to be lightweight, and it supports Docker stats, historical metrics, alerts, multi-user access, OAuth, backups, and API access.
For a homelab, that hits a sweet spot.
My setup
For this deployment, I used:
- one machine to host the Beszel hub
- Docker and Docker Compose
- one or more lab machines running the Beszel agent
- a browser to finish the setup in the web UI
The Beszel hub listens on port 8090 by default, and the Docker-based hub stores persistent data in ./beszel_data. The agent can be run either from a generated compose file inside the web UI or manually using the required KEY, TOKEN, and HUB_URL variables.
Step 1: Deploy the Beszel hub
I like keeping things simple, so I created a folder for it first:
mkdir -p ~/beszel
cd ~/beszel
Then I created a docker-compose.yml file:
nano docker-compose.ymlI pasted in this:
services:
  beszel:
    image: henrygd/beszel
    container_name: beszel
    restart: unless-stopped
    environment:
      - APP_URL=http://192.168.69.167:8090
    ports:
      - 8090:8090
    volumes:
      - ./beszel_data:/beszel_data
That layout follows the current official Docker deployment pattern for the hub: the container exposes port 8090, stores data in ./beszel_data, and uses APP_URL to tell Beszel what address it should consider its main URL. In the docs, the example uses http://localhost:8090, but in a homelab I'd strongly recommend setting APP_URL to the real address you'll actually use.
Then I started it:
docker compose up -dAnd checked that it was running:
docker ps
docker logs -f beszel
At that point I could open it in the browser:
http://192.168.69.167:8090If you're using a domain name or reverse proxy, put that in APP_URL instead. The docs explicitly note that you should change APP_URL to the URL you'll use to access the hub.
Step 2: Create the admin account
Once the container was up, I opened the web UI and created the first admin user.
That part is straightforward. After the hub starts, Beszel prompts you to create an account the first time you visit it.
This is the point where it stops feeling like a backend service and starts feeling like an actual product. The UI is clean, and it doesn't bury the basics.
Step 3: Add my first system
Inside the Beszel web UI, I clicked Add System.
This is where Beszel gives you what you need for the agent side. The official flow is:
- start the hub
- create the admin user
- add a system in the UI
- start the agent
- finish adding the system once it connects
The nice bit is that Beszel generates the agent configuration for you. You don't have to guess the values.
The agent needs these variables:
-
KEY- the public key shown when adding a system -
TOKEN- used to authenticate the agent -
HUB_URL- the Beszel hub address used for the outgoing connection
Step 4: Deploy the Beszel agent on another machine
On the machine I wanted to monitor, I created a folder for the agent:
mkdir -p ~/beszel-agent
cd ~/beszel-agent
nano docker-compose.yml
Then I used a compose file like this:
services:
  beszel-agent:
    image: henrygd/beszel-agent
    container_name: beszel-agent
    restart: unless-stopped
    network_mode: host
    volumes:
      - ./beszel_agent_data:/var/lib/beszel-agent
      - /var/run/docker.sock:/var/run/docker.sock:ro
    environment:
      LISTEN: 45876
      KEY: "<public key from Beszel hub>"
      HUB_URL: "http://192.168.69.167:8090"
      TOKEN: "<token from Beszel hub>"
Then I started it:
docker compose up -dThat matches the current agent Docker pattern from the official docs: host networking, a persistent data directory, read-only access to /var/run/docker.sock for Docker metrics, and the required environment variables for authentication and hub connectivity.
If you prefer, Beszel can also generate the exact docker-compose.yml for the agent from inside the web UI. The docs actually recommend copying the content straight from the Add System dialog, which is probably the safest way to avoid typos.
Step 5: Finish adding the system
Once the agent was running, I went back to the hub and completed the setup.
If everything is correct, the new system appears in the table and flips green. If it stays red, Beszel's docs point you to the common issues page.
That was basically it.
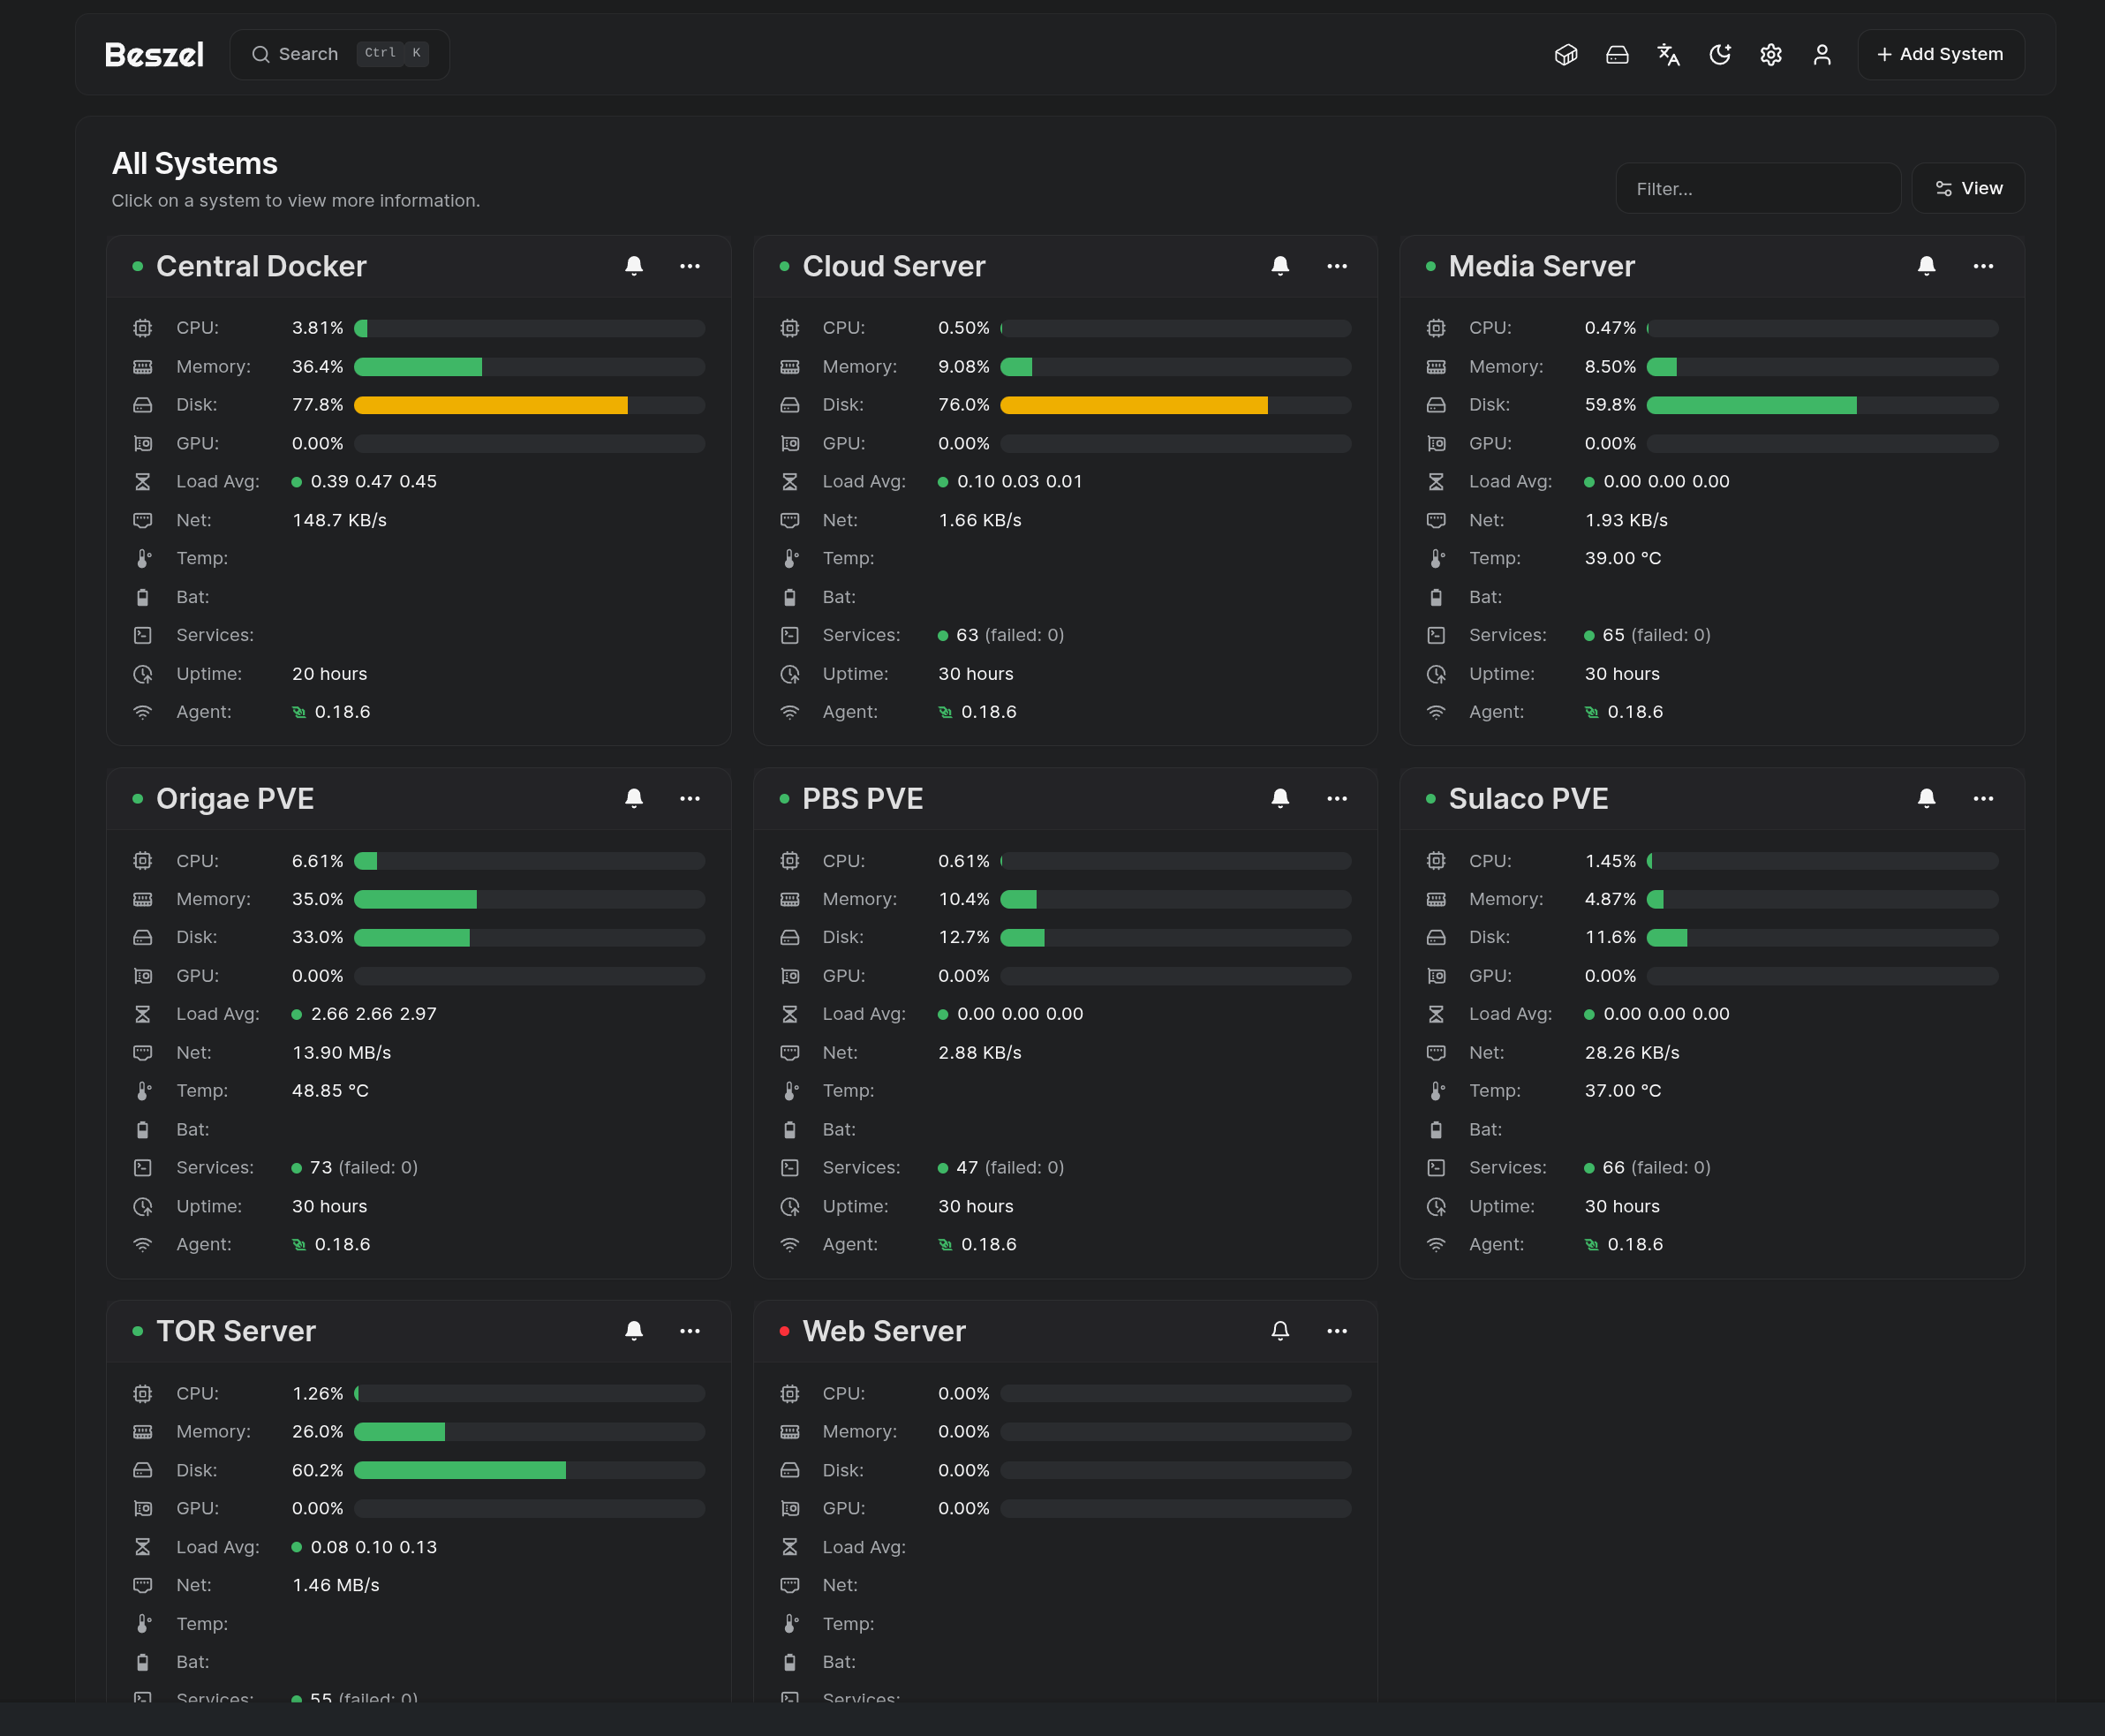
A few seconds later I had the machine showing up in the dashboard, along with the stats I actually cared about.
Monitoring the same machine that hosts the hub
If you want to run the hub and agent on the same box, Beszel supports that too, but there's one important catch: localhost won't work the way people expect when both are in Docker containers on separate networks.
The official guidance is to connect them with a Unix socket instead, using a compose file that mounts ./beszel_socket into both containers and points the web UI host field at:
/beszel_socket/beszel.sockThat's the recommended method for a local Docker-to-Docker deployment on the same machine.
For reference, the combined hub + local agent compose looks like this:
services:
  beszel:
    image: henrygd/beszel:latest
    container_name: beszel
    restart: unless-stopped
    environment:
      APP_URL: http://localhost:8090
    ports:
      - 8090:8090
    volumes:
      - ./beszel_data:/beszel_data
      - ./beszel_socket:/beszel_socket

  beszel-agent:
    image: henrygd/beszel-agent:latest
    container_name: beszel-agent
    restart: unless-stopped
    network_mode: host
    volumes:
      - ./beszel_agent_data:/var/lib/beszel-agent
      - ./beszel_socket:/beszel_socket
      - /var/run/docker.sock:/var/run/docker.sock:ro
    environment:
      LISTEN: /beszel_socket/beszel.sock
      HUB_URL: http://localhost:8090
      TOKEN: <token>
      KEY: "<key>"
That example is taken directly from the current Beszel docs for the "hub and agent on the same system" scenario.
Reverse proxy notes
If you put Beszel behind NGINX or another ingress/proxy, there are two things worth knowing.
First, Beszel uses a WebSocket connection for the agent-to-hub path, so if your proxy has aggressive timeout settings, agents can randomly appear offline. The official docs call out the need to increase proxy read/send timeouts when you're serving the hub behind an ingress controller or reverse proxy.
Second, the web UI uses Server-Sent Events for real-time stats. If your proxy applies gzip or another compression layer to text/event-stream, real-time updates can break. Beszel's troubleshooting docs specifically say compression should be disabled for SSE traffic.
That's one of those tiny details that can waste an hour if you don't know about it.
A few useful commands I kept handy
These aren't magic, but they made day-to-day management easy.
Start or restart the hub:
cd ~/beszel
docker compose up -d
Start or restart an agent:
cd ~/beszel-agent
docker compose up -d
Check running containers:
docker psFollow logs for the hub:
docker logs -f beszelFollow logs for the agent:
docker logs -f beszel-agentStop the hub:
cd ~/beszel
docker compose down
Stop the agent:
cd ~/beszel-agent
docker compose down
Binary install option
I used Docker because most of my lab already runs that way, but it's worth knowing Beszel also supports binary installs.
The official Linux systemd guide includes install scripts for both hub and agent. For the hub:
curl -sLhttps://raw.githubusercontent.com/henrygd/beszel/main/supplemental/scripts/install-hub.sh -o install-hub.sh && chmod +x install-hub.sh./install-hub.sh
For the agent:
curl -sLhttps://raw.githubusercontent.com/henrygd/beszel/main/supplemental/scripts/install-agent.sh -o install-agent.sh&& chmod +x install-agent.sh ./install-agent.sh
The docs say these scripts create a dedicated beszel user, download the latest release, install it as a systemd service, and keep it running after reboot.
So if you don't want containers involved, that route is there too.
What I liked after deployment
The best part of Beszel is that it gave me useful visibility without turning into a side quest.
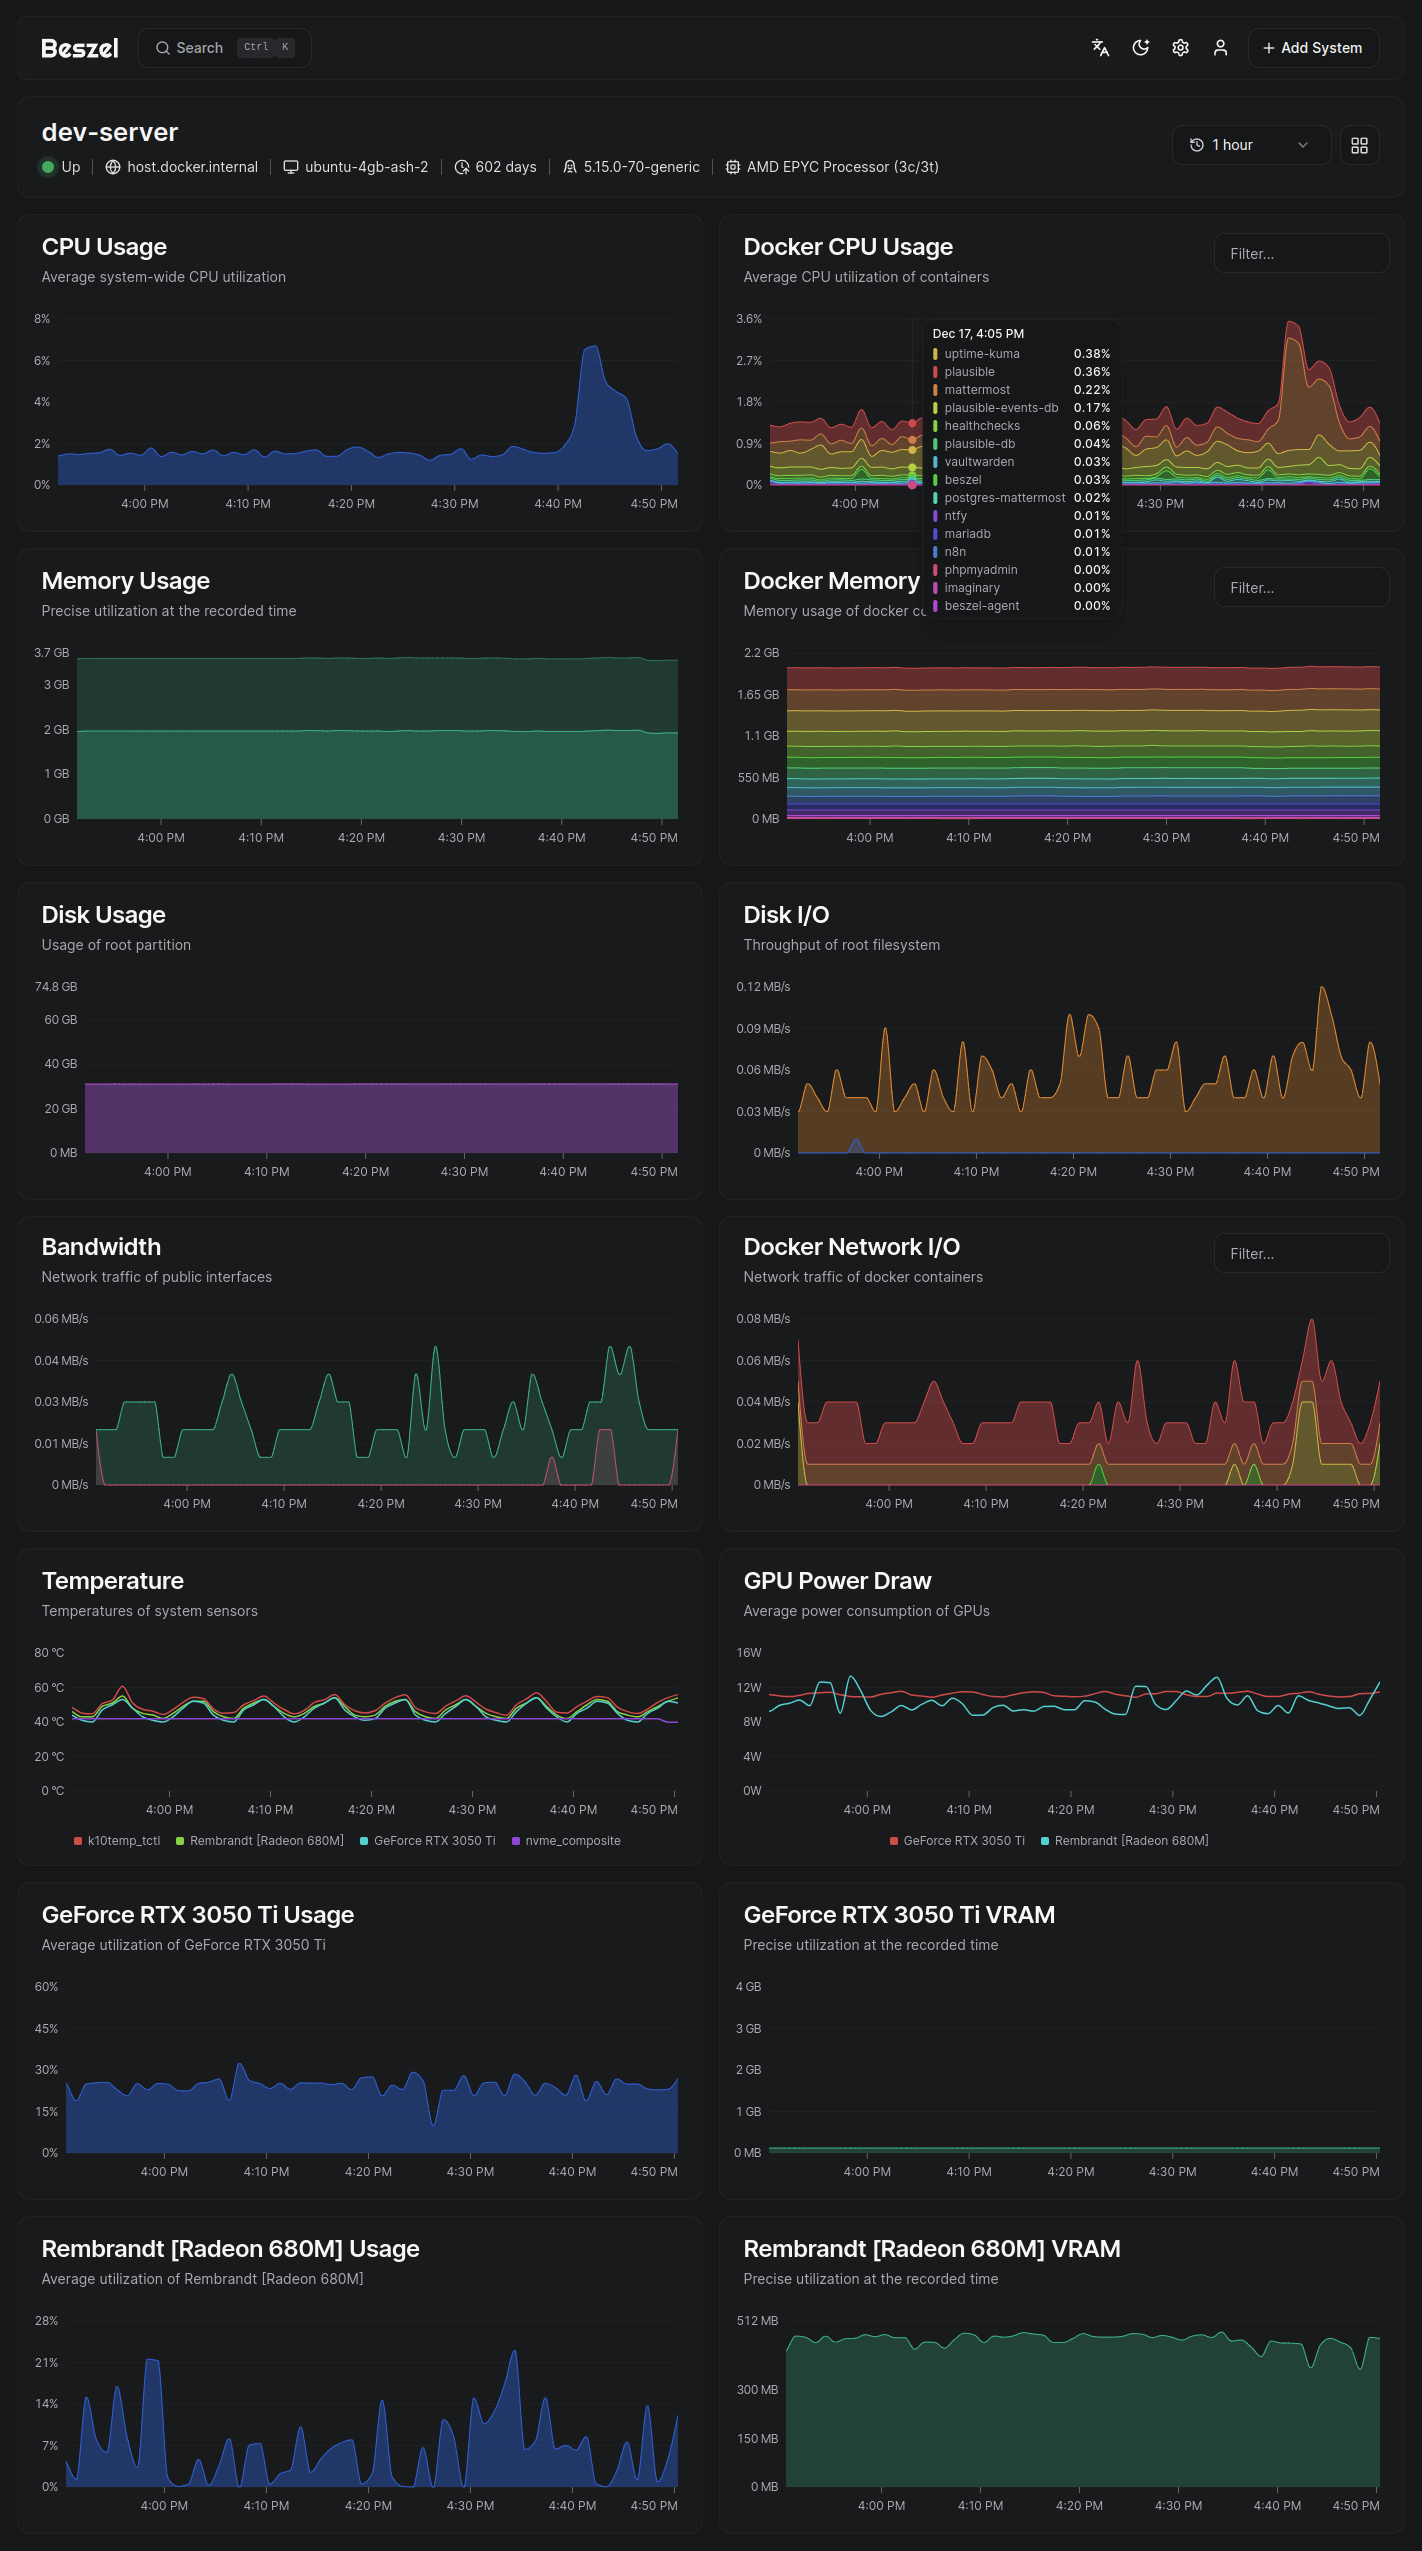
I could see systems in one place, get historical metrics, watch Docker stats, and keep an eye on the parts of the homelab that actually matter. I didn't feel like I was maintaining the monitoring stack more than the machines it was supposed to monitor.
That, to me, is the whole point.
A homelab is already a collection of moving parts. The monitoring layer should reduce friction, not add another full-time hobby. Beszel felt refreshingly sane in that respect. Its current feature set includes Docker statistics, historical data, alerts, backups, multi-user support, OAuth, and API access, which is more than enough for a lot of lab setups.
If you want something lightweight, clean, and practical for a homelab, Beszel is easy to recommend.
The Docker deployment was painless, the agent setup made sense, and I didn't need to wrestle with a giant monitoring ecosystem just to answer basic questions like:
- Is this host healthy?
- Are my containers behaving?
- Did that box quietly start falling over overnight?
That's really all I wanted.
And for once, the setup gave me exactly that.
https://advicelawyer.ru/pag/?promokod_309.html
Hello pals!
I came across a 179 fantastic resource that I think you should dive into.
This tool is packed with a lot of useful information that you might find interesting.
It has everything you could possibly need, so be sure to give it a visit!
<a href=https://noticiando.net/organizacao-a-chave-do-seu-sucesso/>https://noticiando.net/organizacao-a-chave-do-seu-sucesso/</a>
Furthermore do not overlook, everyone, which a person constantly may inside this particular publication discover answers to address the most tangled inquiries. We attempted — lay out all content using the most most accessible method.
приветствую ,.
нашли с сыном <a href=https://steelcentury.ru/dveri/>порошковая покраска ивантеевка</a>
сайт нам нужно сделать с гибка металла на заказ нашими задумками по ттеме
подскажите C советом и как нам ..
нузно знать как понимать или быть в теме..,<a href=https://steelcentury.ru>дверные ручки стоимость</a> подскажите CC данной предмету буду приветствую очень рады .,.
приветствую много благодпрен =_) . нашли в телеге покраска профиля балашиха Порошковая Покраска@SteelCenturyRU
1xBet промокод при регистрации Использование промокода при регистрации на https://fondrgs.ru/wp-includes/pages/1xbet_promokod_bonus1.html позволяет получить бонус до 32 500 рублей, для комфортного старта с полным бонусом.
Hello pals!
I came across a 178 helpful platform that I think you should take a look at.
This site is packed with a lot of useful information that you might find helpful.
It has everything you could possibly need, so be sure to give it a visit!
<a href=https://www.gameworld.gr/news/mobiles/57360-android-gaming-security>https://www.gameworld.gr/news/mobiles/57360-android-gaming-security</a>
And don't neglect, folks, that one always may within the piece find solutions to your the absolute confusing inquiries. Our team tried — explain the complete content using an most accessible way.
Clean, practical, and refreshingly no-nonsense. Love how this makes homelab monitoring feel useful without turning into another full-time project.
1xbet промокод на сегодня 2026. Чтобы удовлетворить ставочников, букмекеры постоянно добавляют новые функции и предложения. Одним из лидеров является 1хБет. Ввод промокода при регистрации позволяет получить увеличенную сумму бонуса. После создания аккаунта внеси первый депозит (до 32 500 рублей) — и получи вознаграждение. Абсолютно бесплатный <a href=https://flashparade.ru/wp-includes/jks/1hbet_promokod_na_segodnya_2020.html>промокод 1хбет при регистрации</a> доступен всем новичкам, чтобы активировать дополнительные преимущества. Игнорировать поле «Введите промокод» — значит потерять выгоду. Оно присутствует при трёх из четырёх способов регистрации (по телефону).