This tutorial will show you how to install your own personal Raspberry Pi-based VPN into your network using PiVPN and WireGuard. Why would you want to do this? A number of reasons – remote access to your local servers and files, surfing through your own Internet connection when on the road, and just general good security practices!
None of this would be possible of course without the PiVPN project which you can find at https://pivpn.io. This project is maintained to be a simple and easy solution for getting OpenVPN or WireGuard VPN services running on a Raspberry Pi – plus it’s a really fun project! Consider contributing to the PiVPN project by clicking here: https://github.com/pivpn/pivpn/blob/master/
Prerequisites – here’s what you need to get started!
(1) Raspberry Pi – recommend the Raspberry Pi 4 w/2GB RAM which is what I’m using for this tutorial. These Raspberry Pi devices can be difficult to get your hands on, but you can check where to purchase them here: https://www.raspberrypi.com/products/raspberry-pi-4-model-b/
(1) microSD card – recommend a 32GB class 10 microSD card such as this one: https://geni.us/dudGT – you will also need a microSD card reader to get it initially provisioned with the Raspberry Pi OS.
Keyboard/monitor hooked up to the Raspberry Pi is optional, but recommended – just makes everything a bit easier! Once you’re past the initial setup, you won’t need a keyboard/monitor connected anymore.
Part 1 – Install Raspberry PI OS Lite (32-bit)
Using a separate PC (I’m using Windows 10 in this tutorial), insert your microSD card into a microSD card reader.
NOTE: All data on the microSD card will be destroyed – make sure this is a microSD card you are OK with erasing!
Download and install the Raspberry Pi Imager: https://www.raspberrypi.com/software/ – v1.7.1 as of the writing of this article.
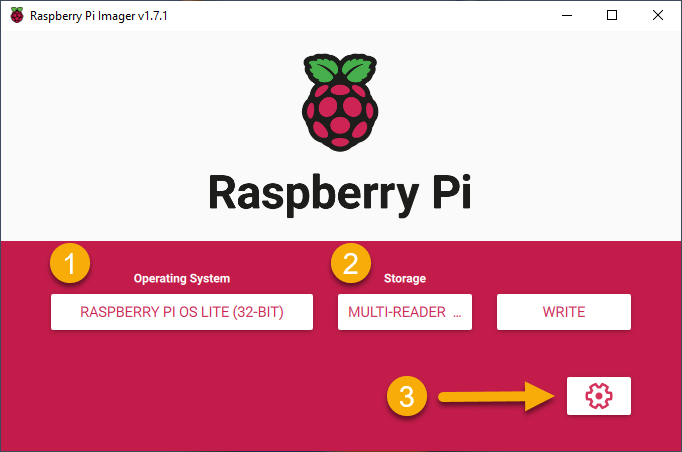
Run the Raspberry Pi imager – we’ll need to select the OS we want, the microSD card as the destination, and then some additional settings.
Operating System: Raspberry Pi OS Lite (32-BIT)
(Available under Raspberry Pi OS (other)
Storage: Choose your microSD card drive
Click the gear icon for settings.
Set the following settings (anything unmentioned can remain default):
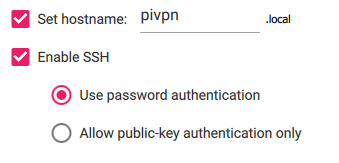
Set hostname: pivpn.local
Check ‘Enable SSH’
- Use password authentication
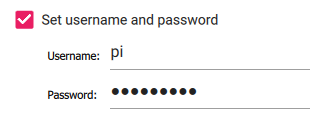
Check ‘Set username and password’
- Set a username if you want, or just leave the default ‘pi’
- Set a password – this will be used to log into your PiVPN once it’s up and running
Check ‘Set locale settings’ and set your time zone/keyboard layout:

NOTE: We’re specifically not using WiFi for this – I have not tested it, and I highly recommend just plugging in a network cable for the most reliable VPN connection.
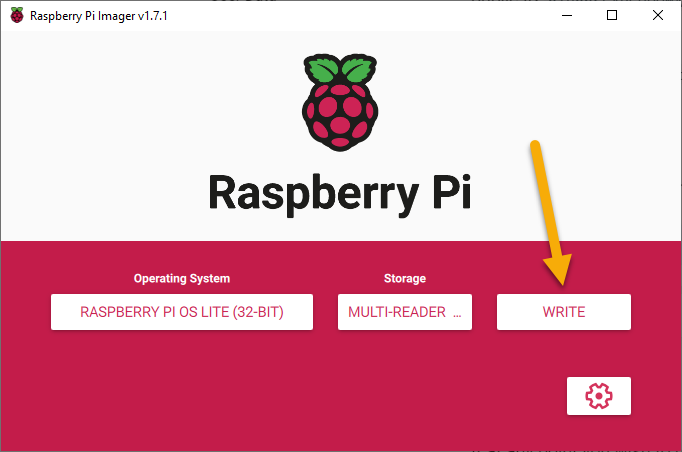
Click ‘Save’ at the bottom and then click ‘Write’ to write the OS to your microSD card.
Part 2 – Boot the Raspberry Pi and Log In
From here, you can either use a keyboard and mouse with a monitor plugged into the Pi, or you can SSH in. If you want to SSH in, you’ll need to know the Pi’s IP address – this can be found a number of ways, but most commonly, you will find the IP that was given to the Pi via DHCP by checking out your DHCP lease table, or you can temporarily hook up a keyboard/mouse/monitor, log in and run the command:
ip ato get the IP address.
NOTE: Speaking of IP A (see what I did there?) – if you are enjoying this tutorial and are looking forward to secure VPN connectivity into your network, consider buying me a beer!
Once booted, login as ‘pi’ and the password that you set in step 1. (Either by using a directly connected keyboard and mouse, or by SSHing to the IP address of your Pi)
Part 3 – Update the Raspberry Pi
Let’s get everything updated! Run this command:
sudo apt update && sudo apt upgrade -yThis will take a few minutes to complete.
Part 4 – Install PiVPN
Run the following command:
curl -L https://install.pivpn.io | bashThis will start the PiVPN installation wizard.

Click OK.
First step is to set a static IP on your PiVPN server. Click OK.
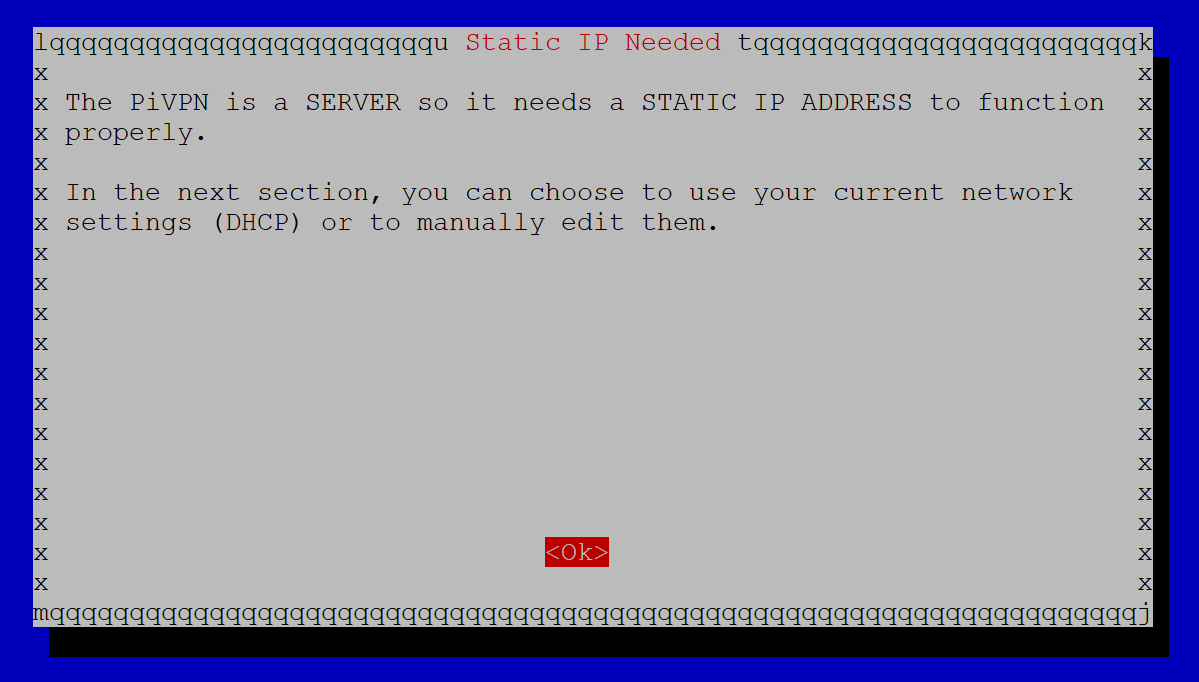
Setting a static IP address basically means that we want PiVPN to run on an IP address that will never change. This is because we will be setting up a firewall rule that allows traffic to flow through to the PiVPN.
You can achieve an IP address that never changes by manually setting an IP address that is outside of your DHCP lease pool range, or by telling DHCP that the IP address assigned to your PiVPN server should never change (this is called a DHCP reservation).
For this tutorial, we will set a static IP address, so we will choose ‘No’ on this screen.
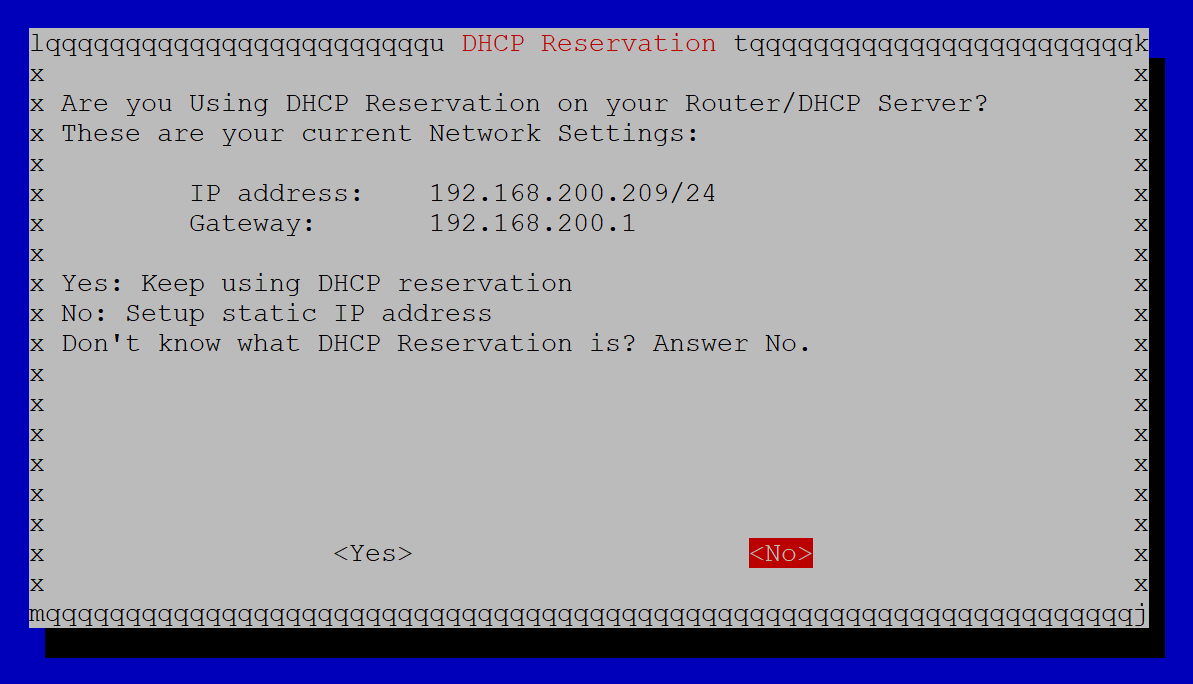
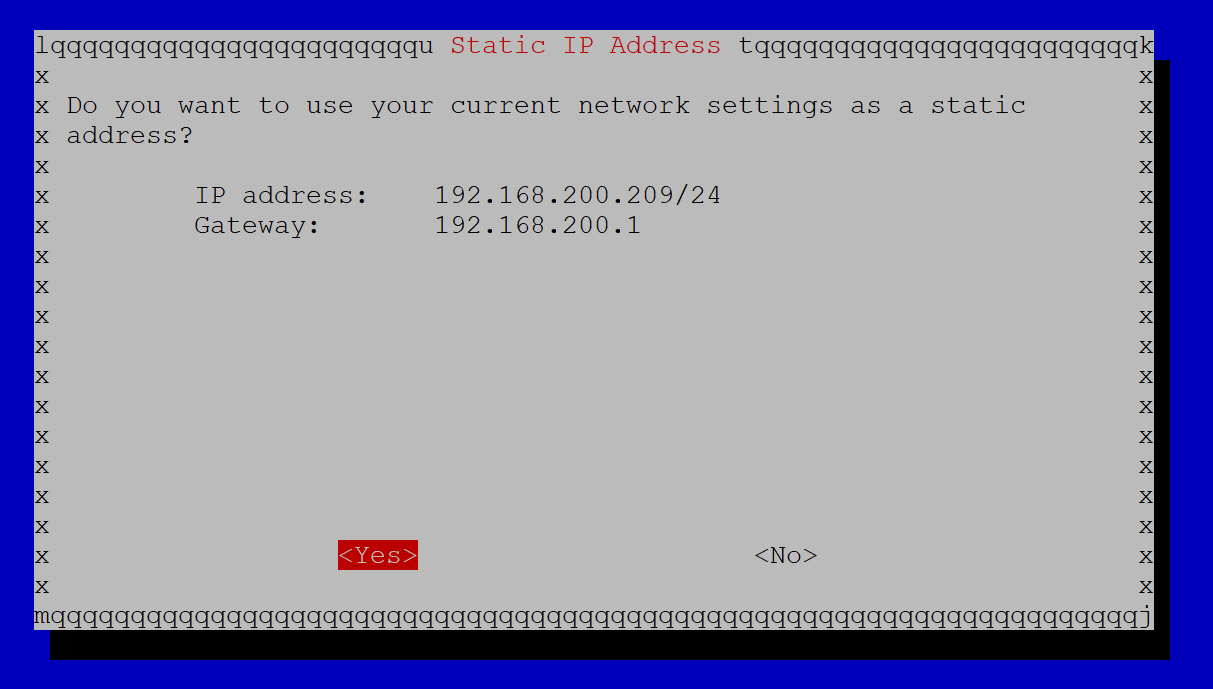
In this example, 192.168.200.209 is the IP address that was given to my PiVPN by the network’s DHCP server. Since we want to set up a static IP, we will have to change this IP to something different. So choose ‘No’ because we don’t want to use the DHCP IP address for the PiVPN.
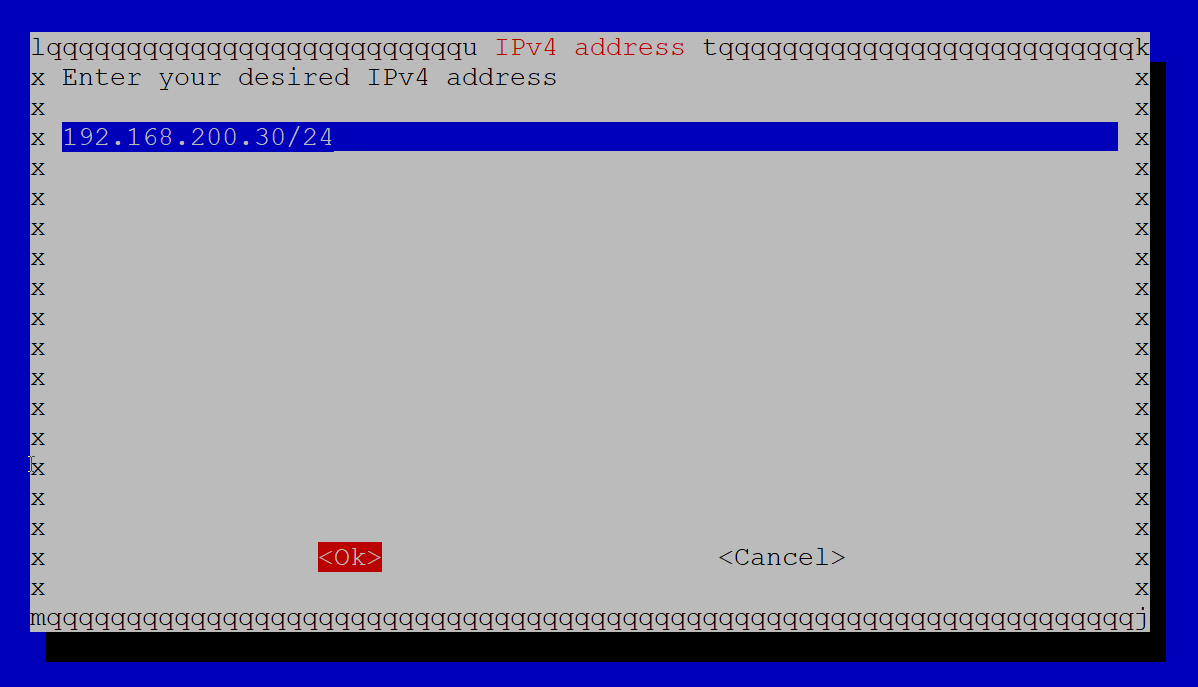
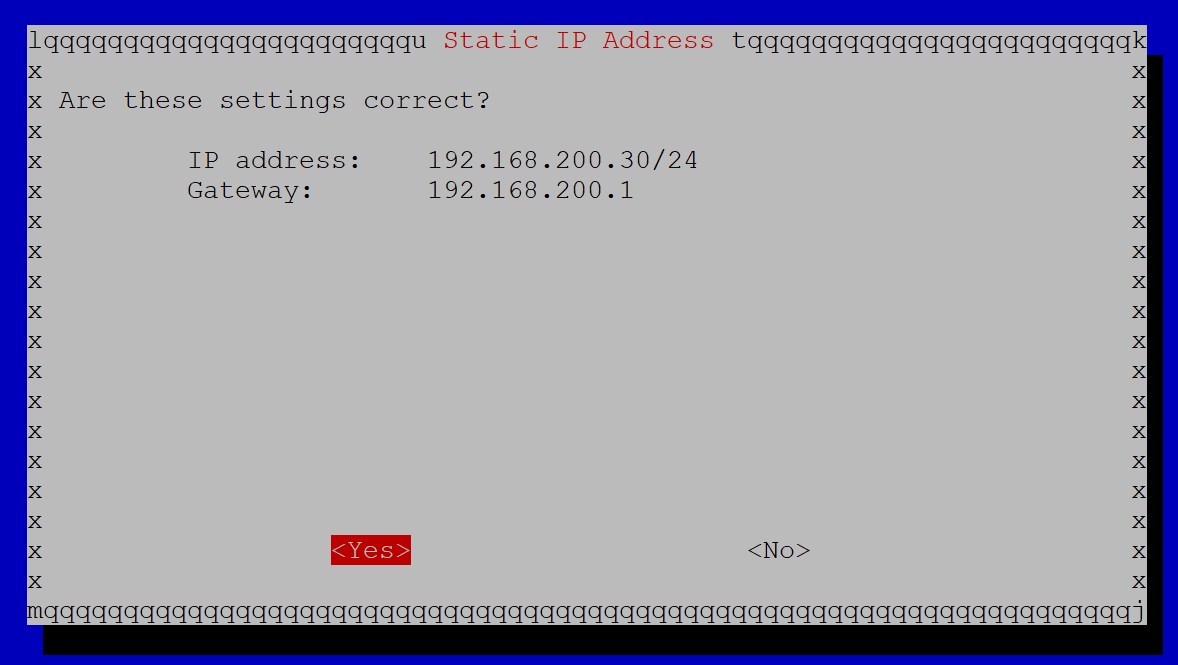
I have set the IP address to 192.168.200.30 in this example, which is an unused IP address outside of my network’s DHCP pool range.
Click OK.
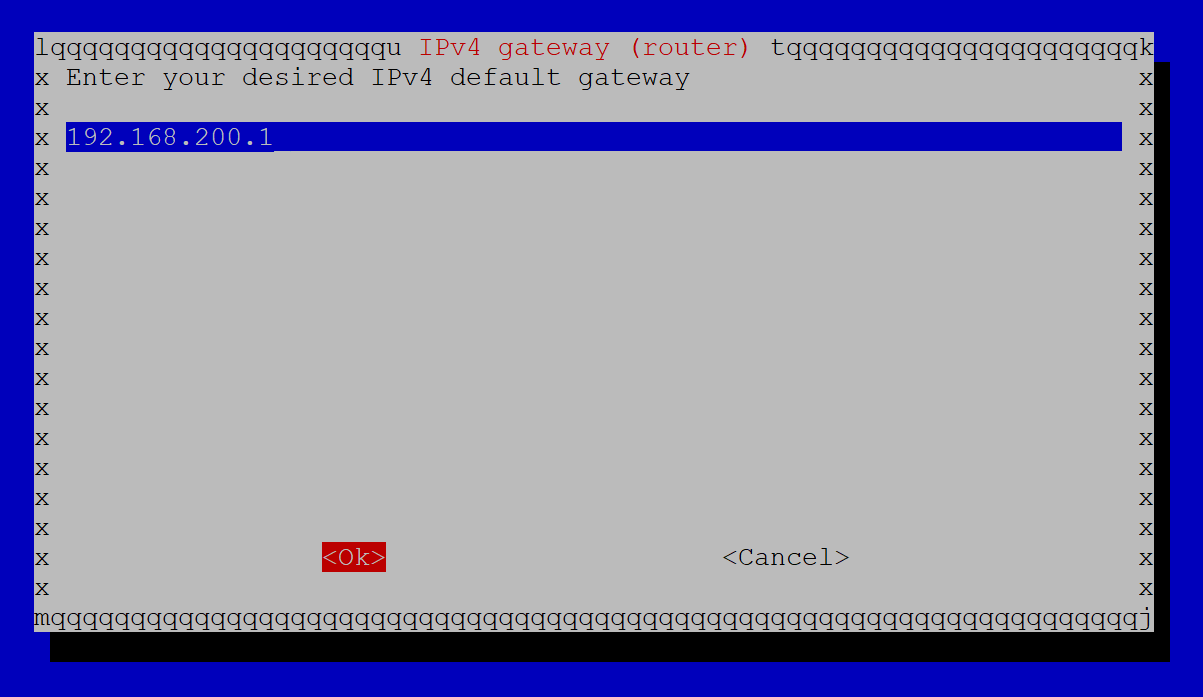
Next, set your gateway IP (it should already be correct) and click OK.
If everything looks OK on the summary screen, click Yes.
Next, we’re going to have to choose a local user for our VPN configurations – since we only have 1 user at this point, just click OK and then choose the Pi user on the next screen.


Click OK.
Next, we want to choose whether we’re going to use WireGuard or OpenVPN as our VPN software. WireGuard is what we’re going to use here – it is newer, faster, and lighter than OpenVPN.
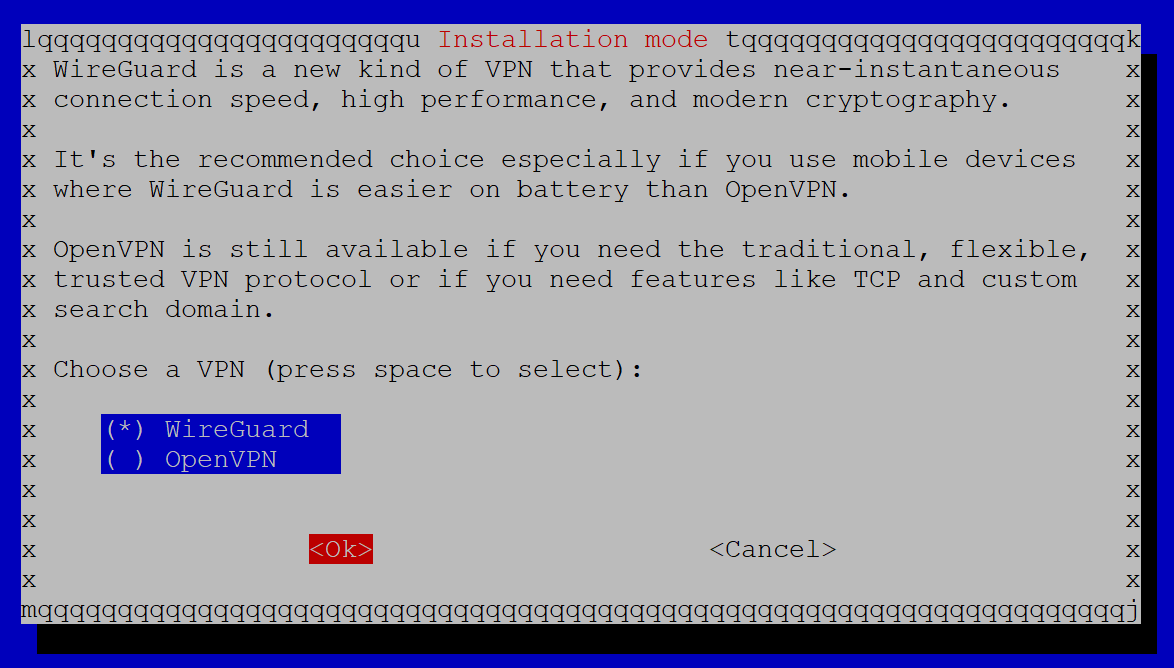
Click OK.
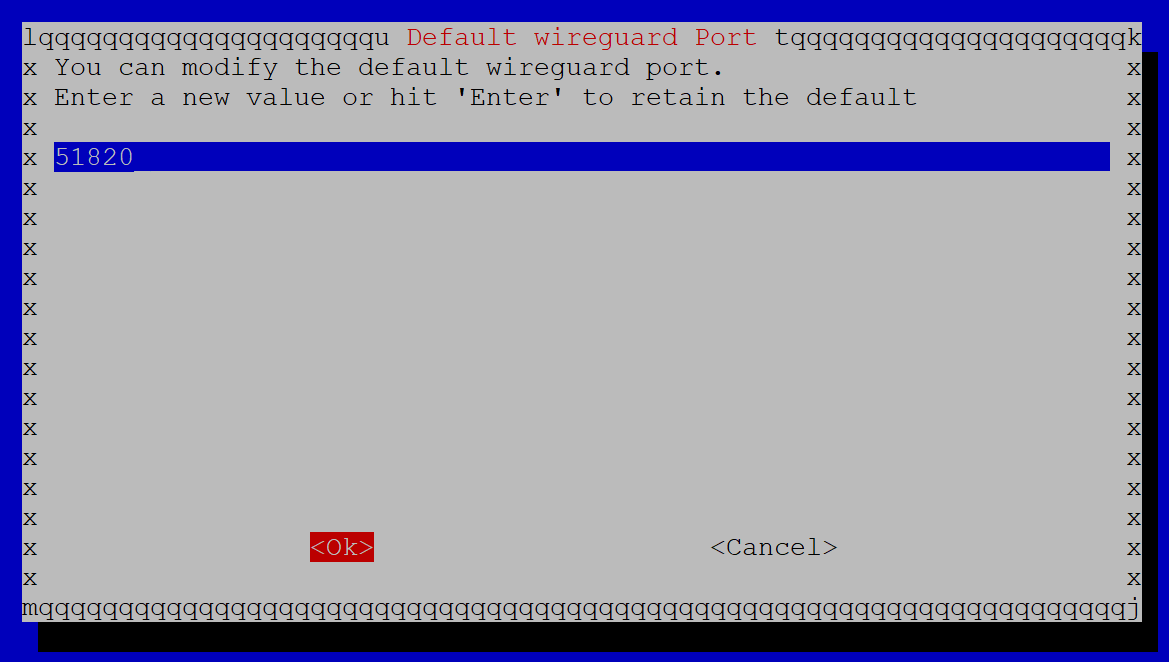
Next, we can select a WireGuard port – UDP 51820 is the default, so we’re just going to leave that and click OK, but you can choose a different port if you want. Just keep in mind that your firewall rule will have to reflect whichever port you choose here.
Click Yes to confirm those settings.

Next, the wizard will ask us to choose a DNS provider for name resolution. You can pick whichever one of these options you want, but I am going to choose ‘CloudFlare’ for this tutorial.
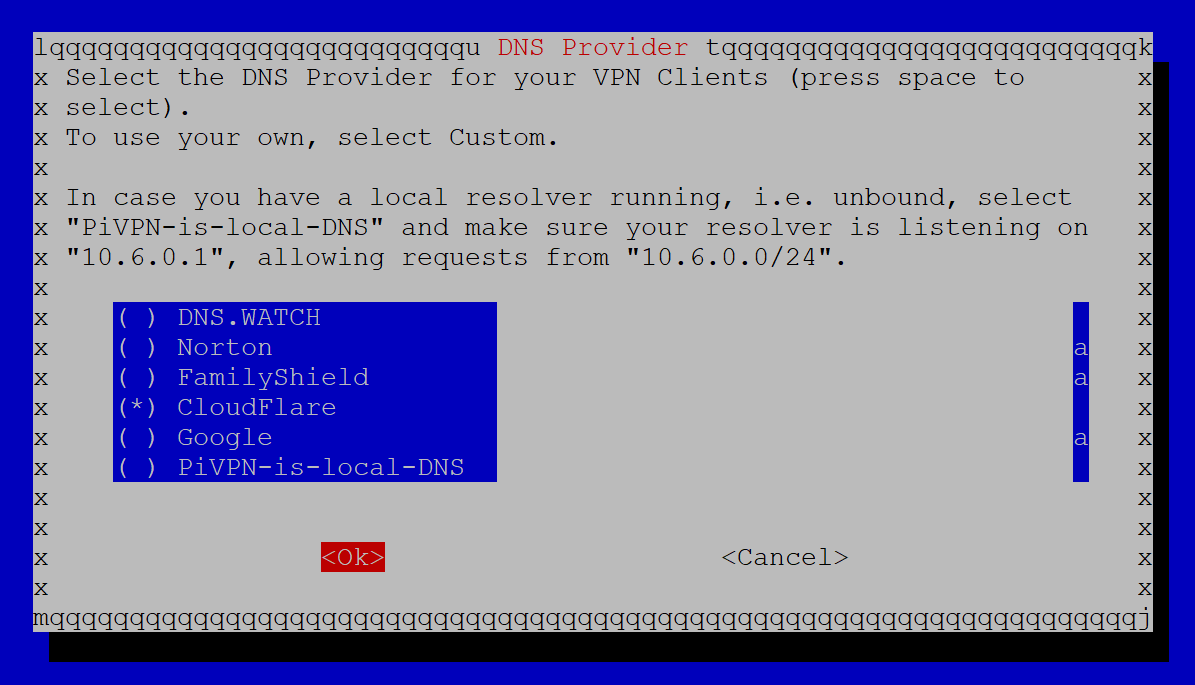
Click OK.
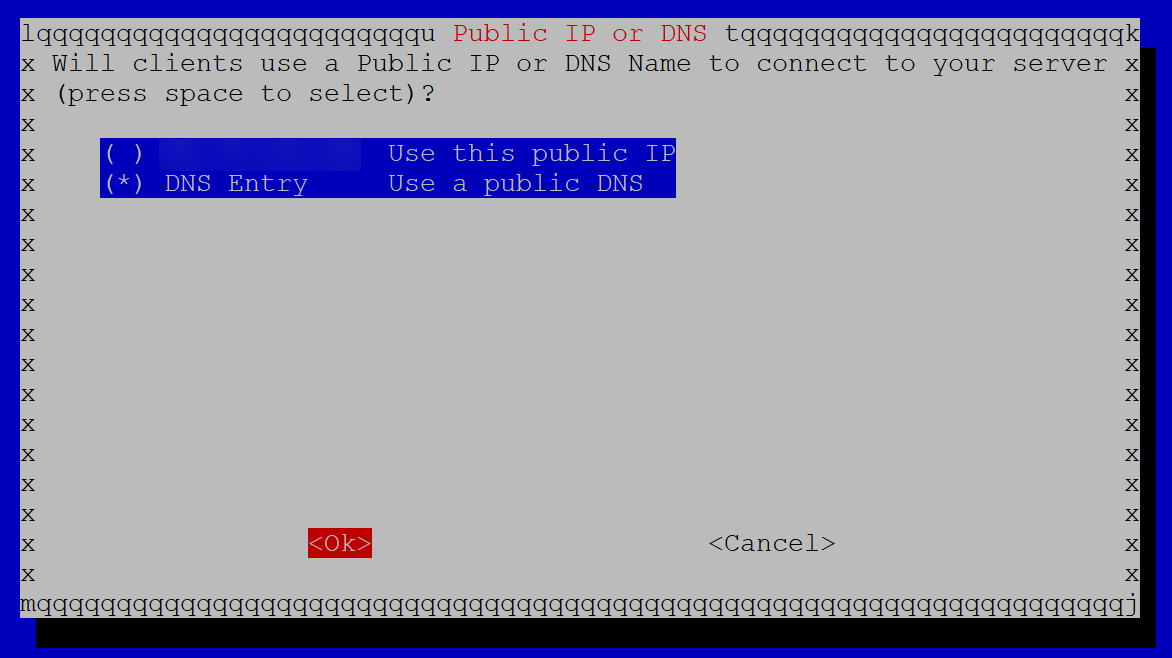
Next, the wizard wants to know if we’re going to connect to PiVPN using a DNS name (FQDN) or a WAN IP address. If you have a static WAN IP address from your ISP, then just choose IP. But, if you do not have a static IP address, you’ll want to use a DNS name – either one that you control yourself, or a dynamic DNS name.
Here are the instructions for either way:
Static IP
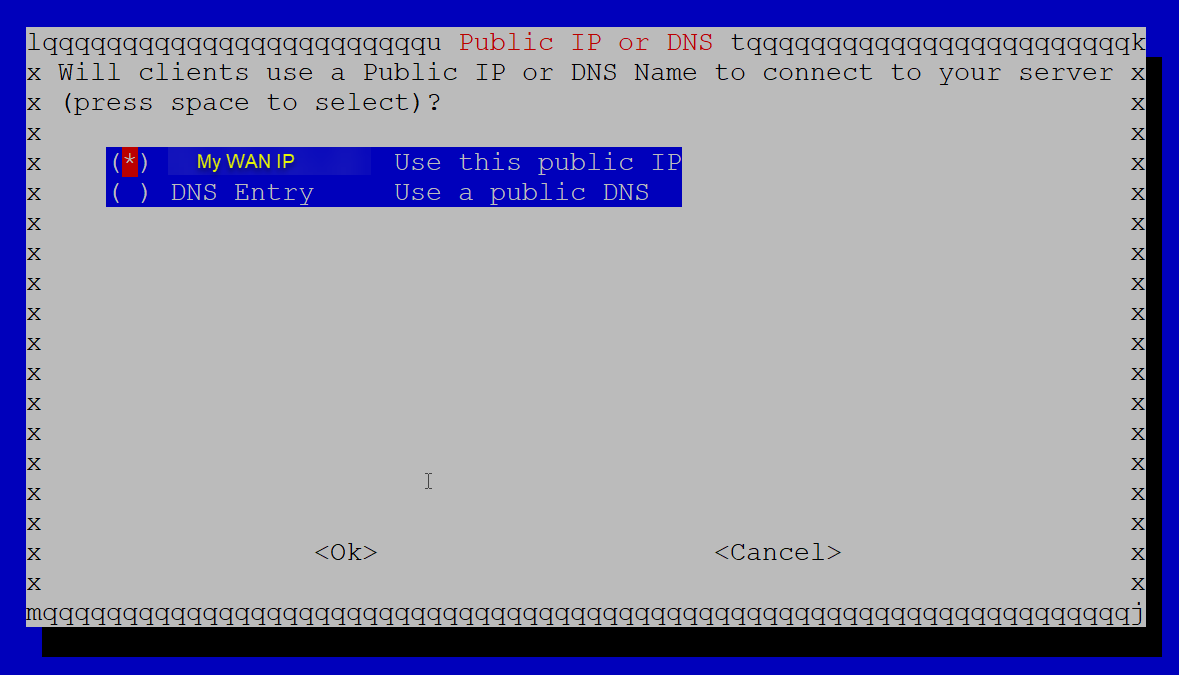
Select your IP and click ‘OK.’
DNS Entry
Select DNS Entry and click OK.
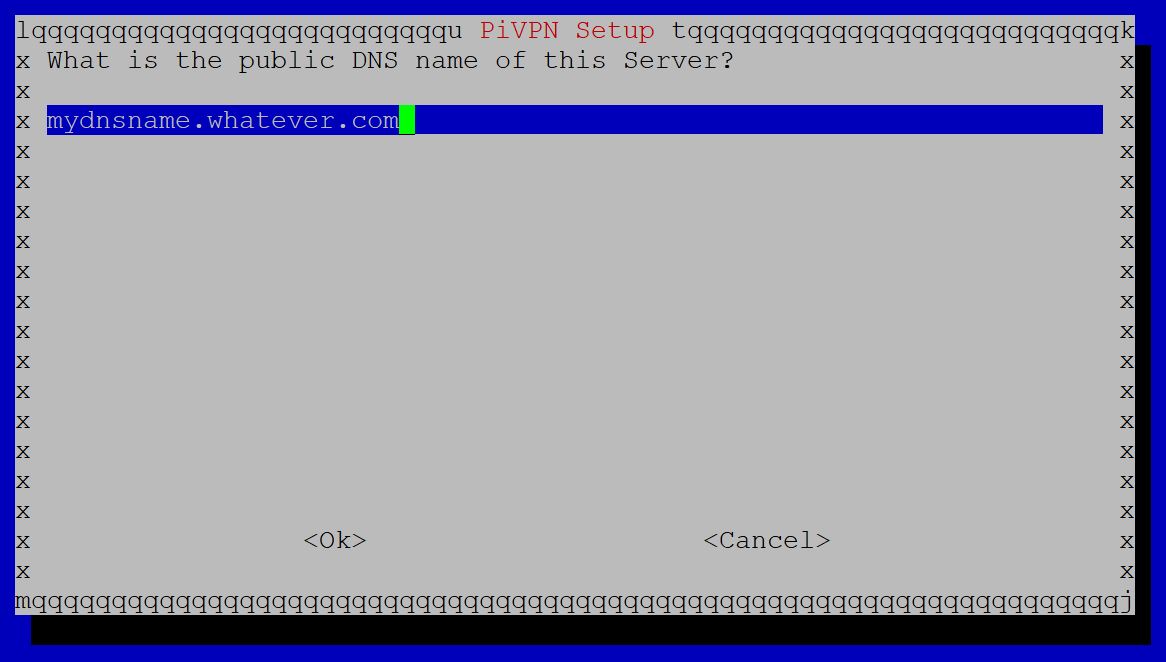
Enter in the FQDN for your PiVPN server and click OK.
Now your server’s encryption keys will be generated. Click OK.

Next, we get a warning message about exposing this server to the Internet. Since we will have a port open through to this server, it is recommended that unattended-upgrades are enabled on the server. This way, any security vulnerabilities will be patched automatically.

Click OK.

Click Yes.
The final screen tells us that we can run ‘pivpn add’ to add VPN users to PiVPN. We will get to this, but first we need to reboot since we changed our static IP address. Click OK.
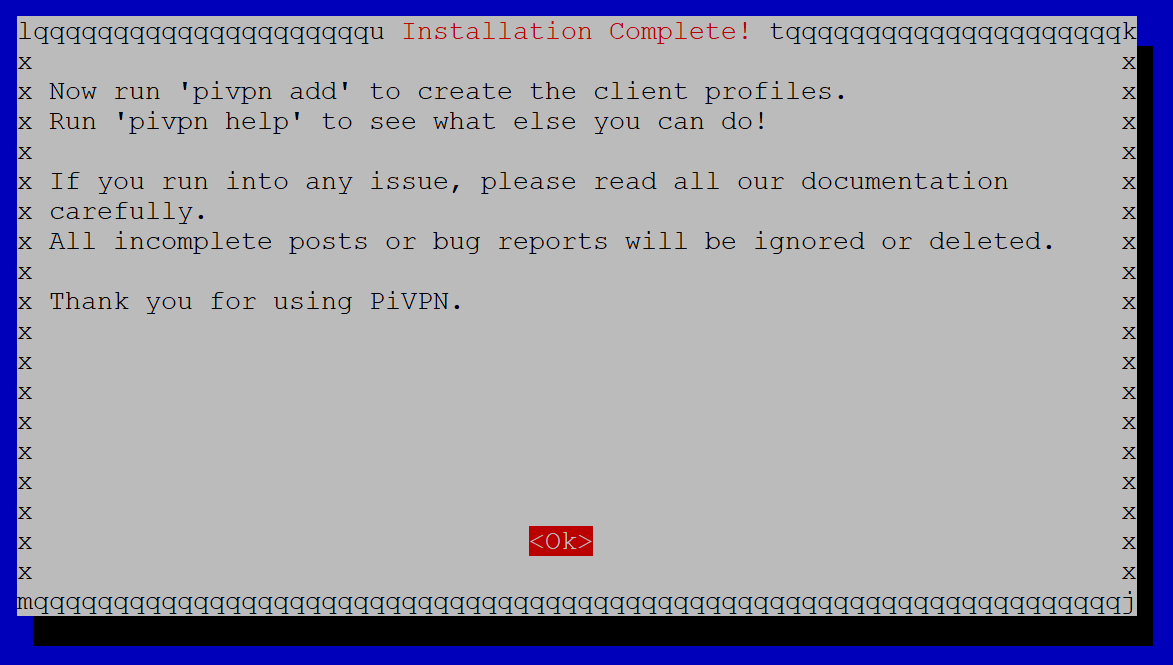
Click Yes to reboot. Followed by OK to confirm.

Part 5 – Add VPN users
Reconnect to your PiVPN server via SSH.
***NOTE: Remember that if you changed your IP address to a static IP, you’ll have to connect to the NEW IP address this time around! In my case, I had set the IP to 192.168.200.30, so I will be connecting to that new IP.
Run this command to add users:
pivpn -aYou will be prompted to enter a name for the client – we’ll call our client ‘client1’ for this example. Ideally, you will have a separate client/user for every device that connects to your PiVPN.
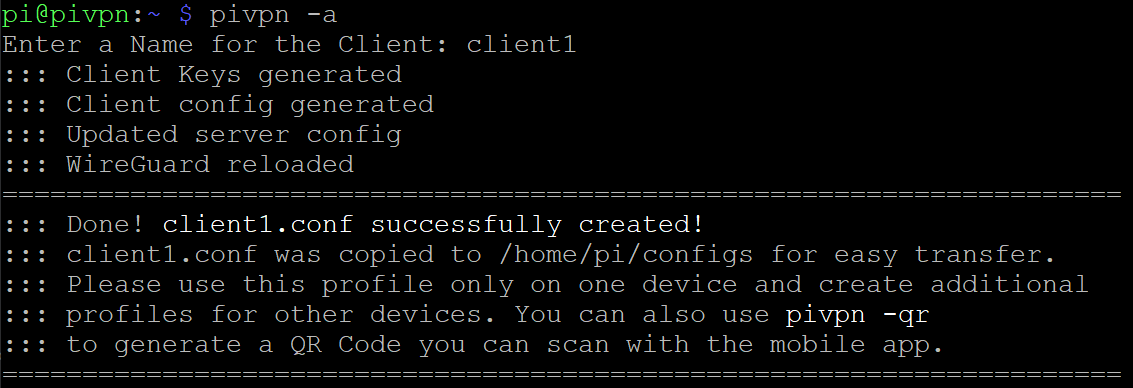
That’s it! Repeat this step for every user you want to create.
Part 6 – Firewall changes
PiVPN / WireGuard requires a port open through your firewall. By default, the port is UDP 51820. Every router/firewall will have an option to port forward through your WAN interface into your LAN, and this process will be different depending on the model of router/firewall you have.
If you don’t know how to port forward through your firewall, just Google ‘[router model] port forward’ and you should find instructions – it’s a very common process.
In my case, I’m running OPNSense – to port forward, I go to the Firewall/NAT tab → Port Forwarding tab.
I entered these settings:
WAN Interface (1): eth0 (your WAN port)
LAN interface (2): eth1 (your LAN port or VLAN)
Port forwarding rules (3):
Original port: 51820 (the port external traffic will come in on)
Protocol: UDP
Forward-to address: 192.168.200.30 (the IP of the PiVPN)
Forward-to port: (leave blank since the destination is the same port as the source)
Description: PiVPN
Click ‘Apply.’ (4)
Part 7 – Connect devices
The PiVPN is all set up and ready to receive clients! So now let’s connect our devices.
NOTE: This article assumes that the devices you’re connecting from are NOT in the same network as your PiVPN. For example, if you’re trying to connect with an iPhone, you may want to disable WiFi and try connecting over LTE instead.
Connect with QR code
PiVPN has an excellent feature that generates a QR code for easy connectivity. If you’re using a device that has the WireGuard app installed, it can add new VPN connections by scanning that QR code. You can generate the QR code in SSH and then scan it on your screen, or print it out for your users.
To generate the QR code for a user, run this command:
pivpn -qrThen, select the user you want to generate the QR code for.

In the WireGuard app, click ‘Add a tunnel.’ Then choose ‘Create from QR code.’ Scan the QR code, and follow the prompts, and you’re good to go! Connect your VPN and you should now be able to see devices on your network. If you go to a website such as https://whatismyip.com, you should see the WAN IP address of your home network.
Try to ping around your network now – you should be able to see any LAN connected devices. If you can NOT ping other devices (like your LAN’s gateway), then run this command
pivpn -dThat will run through a quick debugging wizard that checks settings. Any settings that aren’t set correctly, it will fix. For instance, I have had a couple of times where the IPTABLES rules were not set properly during the install wizard – but running pivpn -d fixed everything.
Connect with conf file
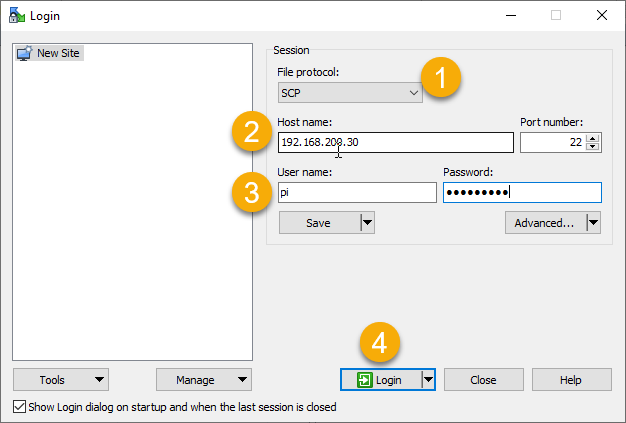
If you don’t have a device that can scan a QR code (like a Windows/Mac/Linux desktop PC), then you can connect to your Pi and download the configuration file manually.
To do this, I am using a program called WinSCP in Windows (it’s free to download and install). After you download, install, and launch WinSCP, you’ll be prompted to connect to a server. Change the File Protocol to SCP, enter in the IP address of your PiVPN, and then type your ‘pi’ username and password – then click ‘Login.’ Accept any windows that pop up about connecting to a new server.
Once connected, you’ll see a ‘configs’ folder in the right-hand window pane. Double-click ‘configs’ and you should see configuration files (user.conf) for your PiVPN users. Download those configuration files to a safe and secure location.
Download and install the Windows WireGuard client, then click ‘Import tunnel(s) from file.’
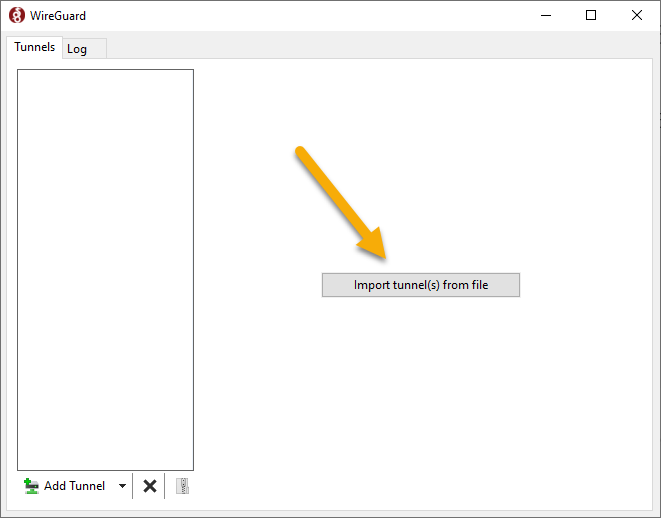
Browse to the file that you downloaded and double-click it. You should now see it imported in your WireGuard client.
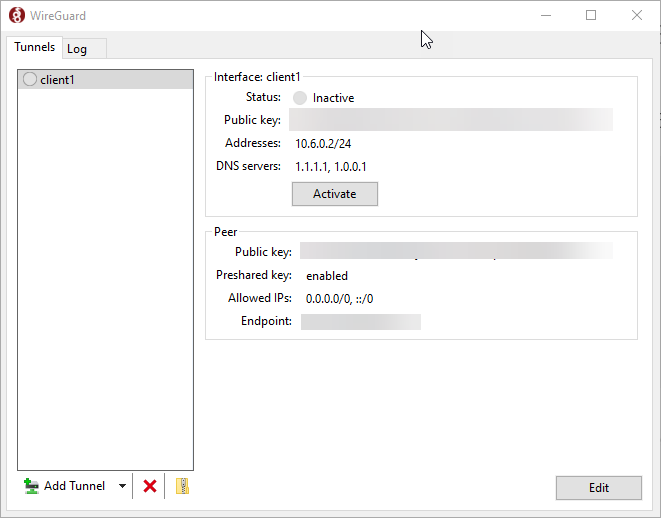
Click ‘Activate’ to activate the tunnel. Your Windows machine should now be connected to the PiVPN server, and should have access to your local LAN!
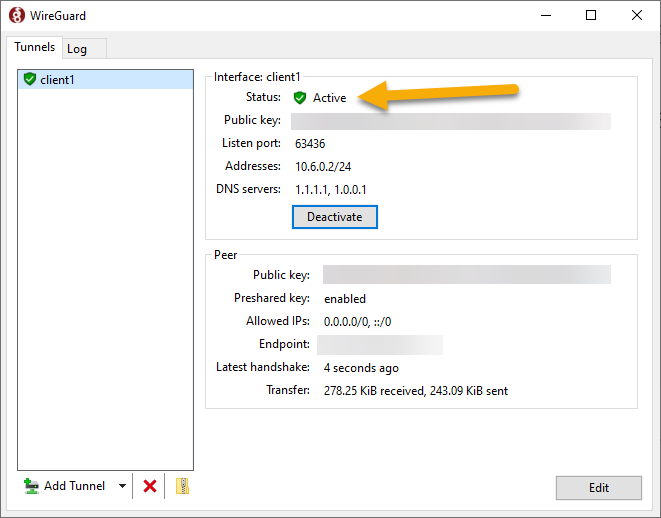
If you go to a website such as https://whatismyip.com, you should now see the WAN IP of your PiVPN network.
If you want to see a list of all connected clients in PiVPN run this command:
pivpn -cAnd you should see everyone who is currently connected.
That’s it! You’re all done.
Part 8 – Back up your PiVPN server
Well….not quite done yet. Because you wouldn’t want to skip backups right? RIGHT?!?
Run this command:
pivpn -bkThis will create a backup TGZ file that contains your PiVPN configs and user profiles. The backup file is created in /home/pi/pivpnbackup. Download that file with WinSCP and save it in a secure location – you’ll also want to be sure to make a new backup anytime you make significant changes to your PiVPN configuration.