
Now, if you’re like me, and you embarked on a self-hosting journey where you’d want to deploy and host everything in your own environment, then you’ve/you’ll probably have this issue – NVIDIA DRIVERS. Oh gosh! I’ve been through countless forum posts and tutorials and nothing worked properly…
Now to give you a little insight on what setup you’d have to have in order for this tutorial to work.
I’m virtualizing a Debian environment on proxmox, where I dockerized jellyfin (through portainer). The GPU, a Quadro P4000 has been passed through the VM in Proxmox, of course.
In order for the GPU to start transcoding whatever you’ll be streaming on your Media Server, you will definitely need drivers for it, so here it is!
*a quick note is that I tried this on Debian 10 and Debian 11. I’m not sure about older versions or even Debian 12*
Step 1: Enable Non-Free Repositories
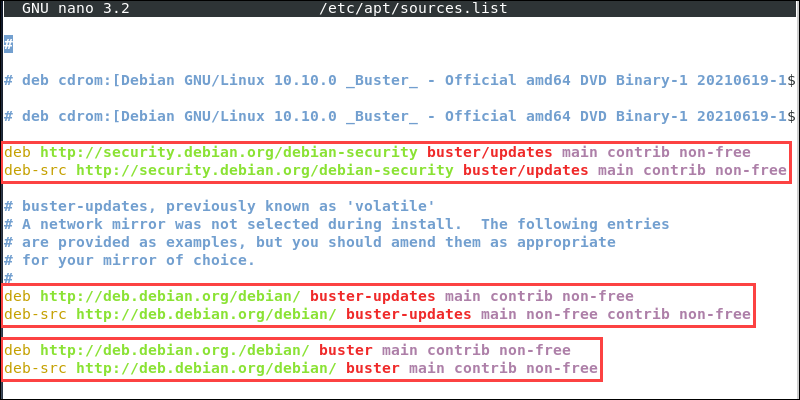
1. Open the Linux’s Advance Packing Tool configuration file using a text editor. For example:
sudo nano /etc/apt/sources.list2. Alter the configuration as necessary, so it contains the following lines:
deb http://deb.debian.org/debian/ buster main contrib non-free
deb-src http://deb.debian.org/debian/ buster main contrib non-free
deb http://security.debian.org/debian-security buster/updates main contrib non-free
deb-src http://security.debian.org/debian-security buster/updates main contrib non-free
deb http://deb.debian.org/debian/ buster-updates main contrib non-free
deb-src http://deb.debian.org/debian/ buster-updates main contrib non-free
3. Press Ctrl+X, then type Y and press Enter to save changes and exit the configuration file.
4. Update the system repository index:
sudo apt updateStep 2: Install Nvidia Detect
Install the Nvidia Detect Utility with:
sudo apt install nvidia-detectStep 3: Detect and Install Drivers
1. Use the Nvidia Detect Utility to check the model of your GPU and get a compatible driver recommendation:
sudo nvidia-detect2. Install the driver the utility recommends. The syntax is:
sudo apt install [driver name]3. Type Y and press Enter to confirm the installation.
4. Once the installation completes, reboot your system with:
systemctl rebootAfter this, if you’re on proxmox, you obviously need to follow all the documentation on how to properly pass through a PCI device on a VM. I am not going to copy/paste their documentation on this post but I am going to link you to it, so be sure to follow up on that as well.
PCI(e) Passthrough on proxmox – https://pve.proxmox.com/wiki/PCI(e)_Passthrough
PIC Passthrough on proxmox – https://pve.proxmox.com/wiki/PCI_Passthrough
Quick footnote. There is also a manual method to install this, by using Nvidia’s official package and if you need to know how to do that, please just leave a comment or email me and I will gladly assist you with that.
